


How to Handle the Emotional Rollercoaster Post-STD Diagnosis
Receiving a diagnosis of a sexually transmitted disease (STD) can be a profoundly unsettling experience, marked not only by physical health concerns but also by a complex spectrum of emotional […]

6 Tech Tips for Smaller Businesses
Running a small business is no easy feat. You are responsible for everything from operations to sales to marketing and often on a tight budget. Planning is crucial and your […]

How Companies Are Using AI in Digital Marketing
AI has been changing the business landscape; various AI tools have taken the world by storm and helped companies grow. In today’s era, the most important aspect of a company’s […]

Your Guide to Becoming a Massage Therapist: Steps and Tips for Success
The path to becoming a massage therapist can be as rewarding as it is challenging, offering a unique blend of hands-on healing and personal connection. Whether you’re drawn to the […]

Crypto Affiliate Marketing 2024: Offer.One as an Innovative Network in Crypto Niche
In the world of online ads, advertisers are always trying to find good ways to reach the right people and make sales. One cool way to do this is by […]

The Evolution of Hyperbaric Chambers
Hyperbaric chambers have undergone significant advancements in technology over the years, revolutionizing their effectiveness and applications. From their humble beginnings as simple pressurized vessels to today’s state-of-the-art chambers equipped with […]

Top 5 NSFW Chatbot AI Tools To Try in 2024
In the evolving landscape of AI technology, NSFW (Not Safe For Work) chatbots have carved out a niche, offering unique and often controversial services. The year 2024 sees these tools […]

What Can Someone Do with My IMEI Number? Risks and Precautions
An IMEI (International Mobile Equipment Identity) number serves as a unique identifier for mobile devices. This article aims to shed light on the potential dangers of sharing your IMEI number […]
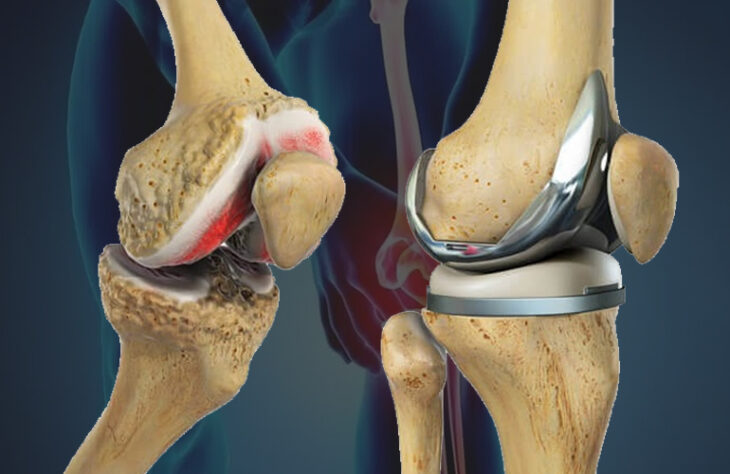
Preparing for Knee Replacement Surgery
Prepare for knee replacement surgery with essential tips on exercises, diet, and weight management. Learn the benefits of surgery abroad, including cost savings. Knee replacement surgery is a common procedure […]

Unveiling the Wonders of London Tower Bridge: Tips for an Unforgettable Visit
London Tower Bridge, an iconic symbol of London’s rich history and architectural ingenuity, stands majestically over the River Thames, connecting the City of London with Southwark. It’s not just a […]